All rows and columns and content blocks (text, images, video, etc.) allow you to adjust the margins and padding or apply a border.
Margin: this is the amount of space outside the Row, Column or Content block
Padding: this is the amount of space inside the Row, Column or Content block
If you will set up complex content layouts, it is important to understand how margin and padding work and why you would use them.
Padding and margins are very similar, and it can be difficult to know which one you should use. The basic purpose of both is to change the amount of space between elements on the page and change their positions by creating or minimising whitespace.
To understand the difference between padding and margins, you should first know how elements are displayed on the page. An element (text, images, video, etc.) on the page comprises the content itself, space around the content, a border around the content, and space between the border and the border of the next element. Padding affects the space between the content and the border. Margins affect the space between the border and the next element. The border may not be visible in some cases but will still be affected by padding and margins.
![QuoteCloud - Sales Quote, Sales Proposal and Contracts Software - Margins, Padding and Borders for content blocks - illustration 0d8172c2-60a2-4e57-bf8a-32ffab1f265f](/_next/image?url=https%3A%2F%2Fs3.quote.cloud%2Fstores%2F_images%2Fhelp_center_Mar2020%2FRows-Columns-Padding-and-Margin-1.webp&w=3840&q=100)
A good example of the difference between padding and margins can be seen when applied to a row's background image. A row is a single element on a sales quote page. Applying a background colour to a row will make the borders of the row obvious.
The row's padding affects the space between where the content within the row ends and the background colour of the row ends. Add padding to a row background will increase the amount of coloured space outside of the content.
With no padding applied, there is no coloured space around the content.
![QuoteCloud - Sales Quote, Sales Proposal and Contracts Software - Margins, Padding and Borders for content blocks - illustration e487e90e-92cc-4639-8061-82d5158990aa](/_next/image?url=https%3A%2F%2Fs3.quote.cloud%2Fstores%2F_images%2Fhelp_center_Mar2020%2FRows-Columns-Padding-and-Margin-2.webp&w=3840&q=100)
In comparison, the margins are the space beyond the coloured background, between the row and the next row. Adding margins to a row background will increase the white space between the row and the row next to it, i.e. it will push the row down or up, left or right, away from the other row.

![QuoteCloud - Sales Quote, Sales Proposal and Contracts Software - Margins, Padding and Borders for content blocks - illustration 76038ce9-7ccc-4c07-b444-6681adda234f](/_next/image?url=https%3A%2F%2Fs3.quote.cloud%2Fstores%2F_images%2Fhelp_center_Mar2020%2FRows-Columns-Padding-and-Margin-3.webp&w=3840&q=100)
Paddings and margins can be added on any site around the content to add padding or margins to content, row, or column.
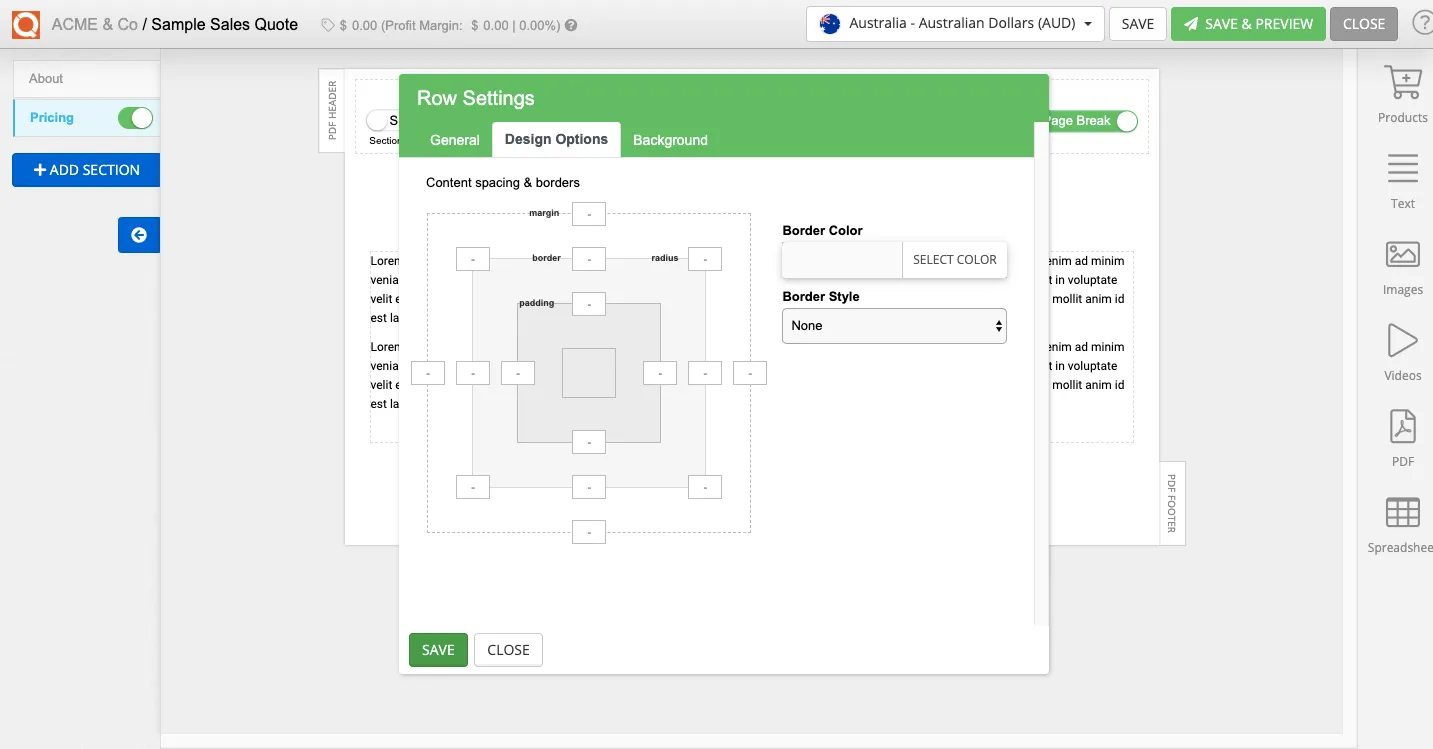
To explain how padding and margin are applied to a row, create a content block (for example, text, image, or video). This will automatically create a row containing one column. In our example below, we have used a text block. Hover on your content block, and you will see the Row and Column toolbar appear as well as the toolbar for your content block.
Click on the cogs icon of the Row (we will use a Row to demonstrate the margin and padding feature)
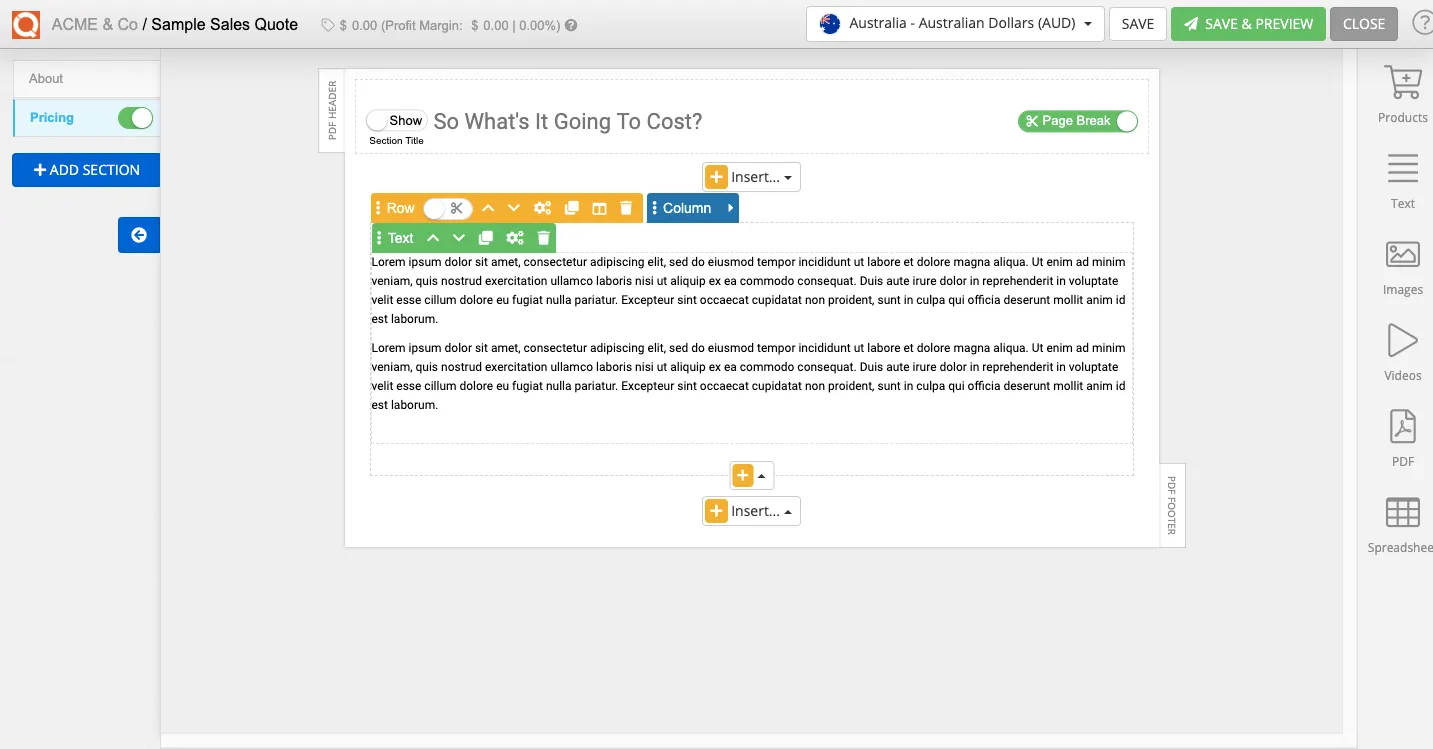
![QuoteCloud - Sales Quote, Sales Proposal and Contracts Software - Margins, Padding and Borders for content blocks - illustration 795ef4d6-2ce3-4435-80bc-74714e583627](/_next/image?url=https%3A%2F%2Fs3.quote.cloud%2Fstores%2F_images%2Fhelp_center_Mar2020%2FRows-Columns-Padding-and-Margin-4.webp&w=3840&q=100)
Click on the Design Options tab.
![QuoteCloud - Sales Quote, Sales Proposal and Contracts Software - Margins, Padding and Borders for content blocks - illustration 3a052645-5e8a-4b94-91b5-9b1111f538d7](/_next/image?url=https%3A%2F%2Fs3.quote.cloud%2Fstores%2F_images%2Fhelp_center_Mar2020%2FRows-Columns-Padding-and-Margin-5.webp&w=3840&q=100)
Type a value in the area where you would like to add the margin and padding (in pixels or a percentage). In the example below, we have added padding to the left and right of the content.
![QuoteCloud - Sales Quote, Sales Proposal and Contracts Software - Margins, Padding and Borders for content blocks - illustration 8d6e44b0-f91a-44b4-b5ad-348d3c26802f](/_next/image?url=https%3A%2F%2Fs3.quote.cloud%2Fstores%2F_images%2Fhelp_center_July2020%2FSales-Quote-Editor-Margins-and-Padding-1.webp&w=3840&q=100)
Adding Borders
If you would like to add a border to an element such as Row, Column or Content Block such as text, images, video, etc., the process is similar to the above.
We will use an image as an example in this tutorial.
Click on the Insert... in the sales quote editor.
Click on the Add Image option to add an image to your sales quote.
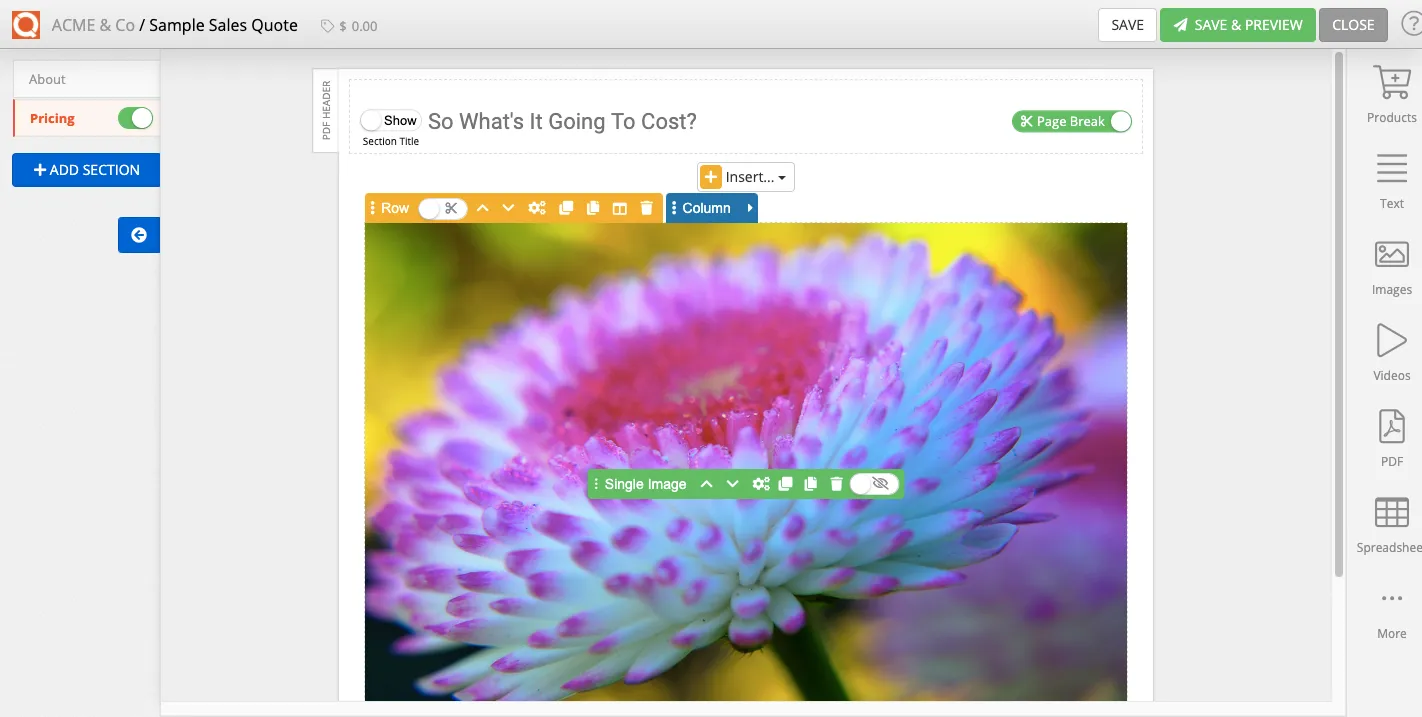
![QuoteCloud - Sales Quote, Sales Proposal and Contracts Software - Margins, Padding and Borders for content blocks - illustration cb27f978-9185-403c-bec2-200b90f59f6e](/_next/image?url=https%3A%2F%2Fs3.quote.cloud%2Fstores%2F_images%2Fhelp_center_July2020%2FSales-Quote-Editor-Borders-2.webp&w=3840&q=100)
Click on the cogs icon on the green tab bar to open the settings for the image block.
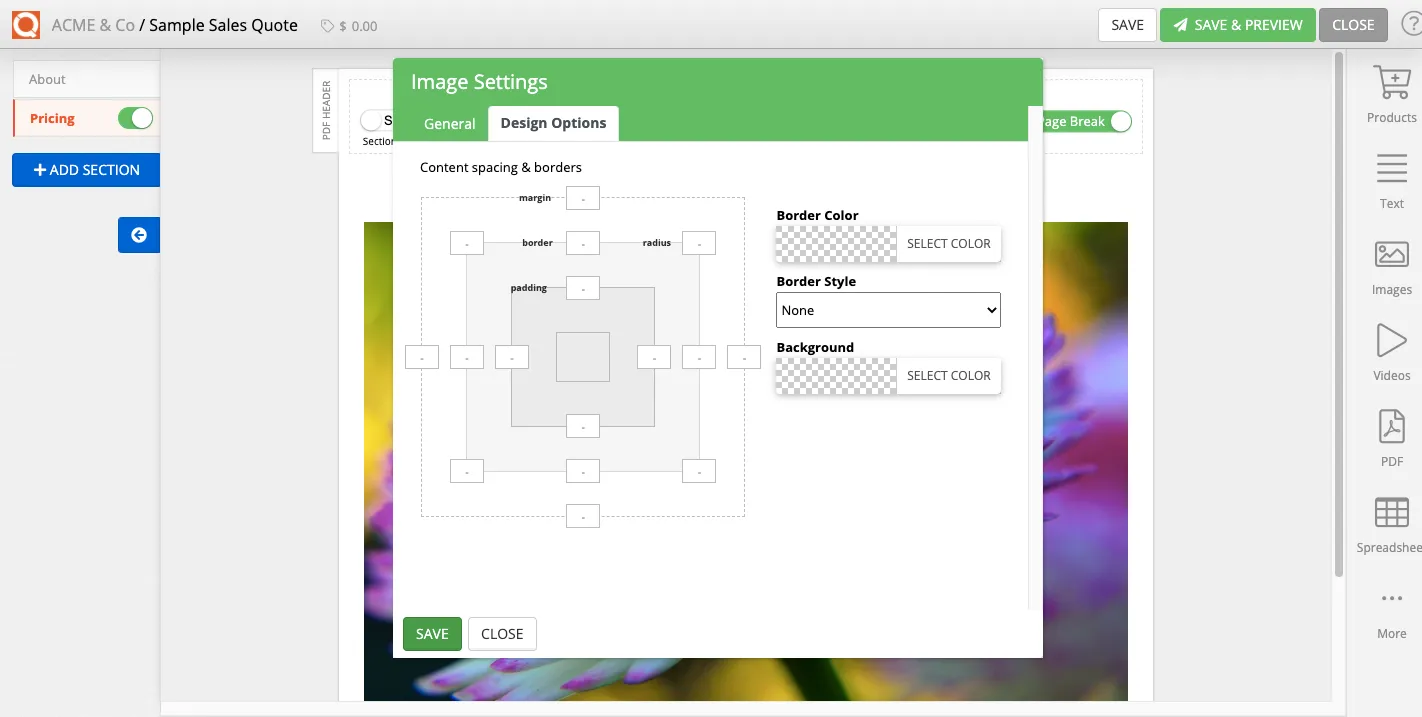
![QuoteCloud - Sales Quote, Sales Proposal and Contracts Software - Margins, Padding and Borders for content blocks - illustration 2892d5d8-6517-4264-9e7f-ca6f73c4b734](/_next/image?url=https%3A%2F%2Fs3.quote.cloud%2Fstores%2F_images%2Fhelp_center_July2020%2FSales-Quote-Editor-Borders-3.webp&w=3840&q=100)
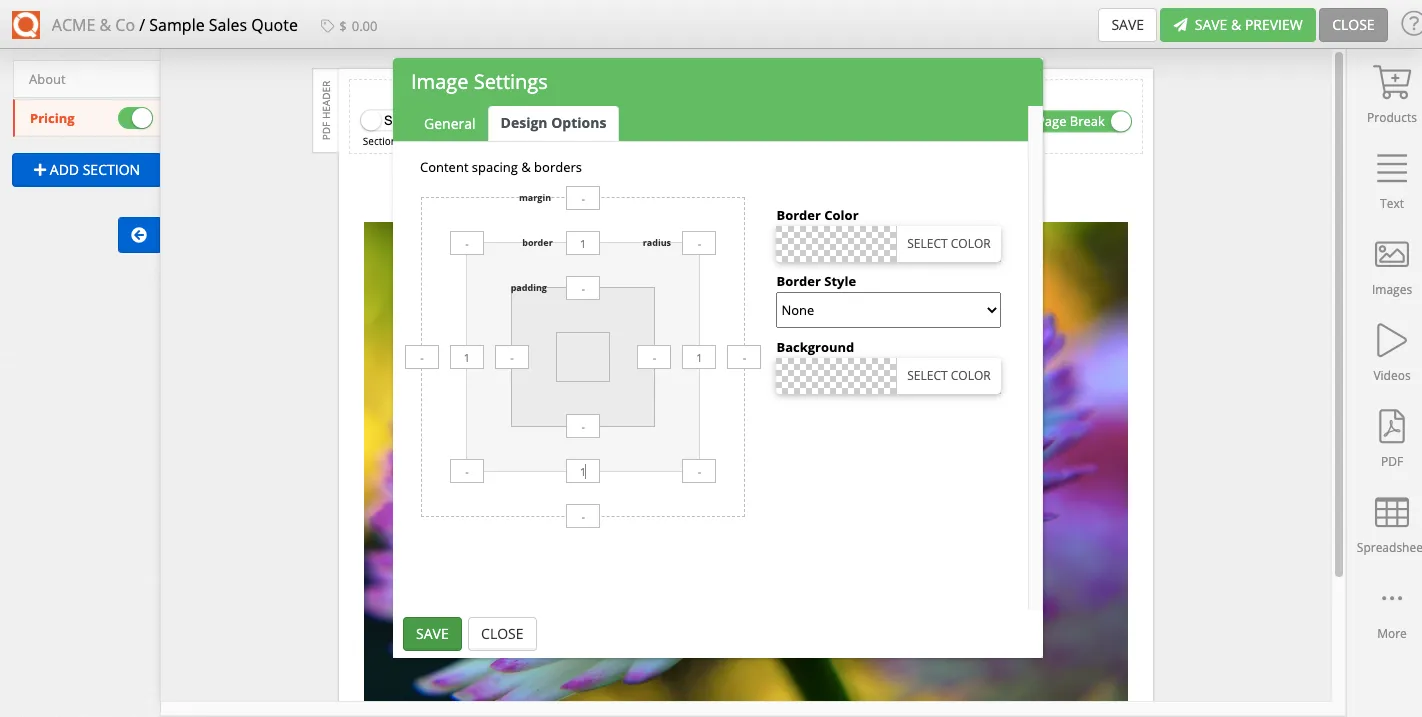
Set the border width for each side of the content block (top, bottom left and right sides); as shown below, we have set all sides as 1 (pixel).
![QuoteCloud - Sales Quote, Sales Proposal and Contracts Software - Margins, Padding and Borders for content blocks - illustration af86b727-8154-4aae-9118-1f9efc3f6f17](/_next/image?url=https%3A%2F%2Fs3.quote.cloud%2Fstores%2F_images%2Fhelp_center_July2020%2FSales-Quote-Editor-Borders-4.webp&w=3840&q=100)
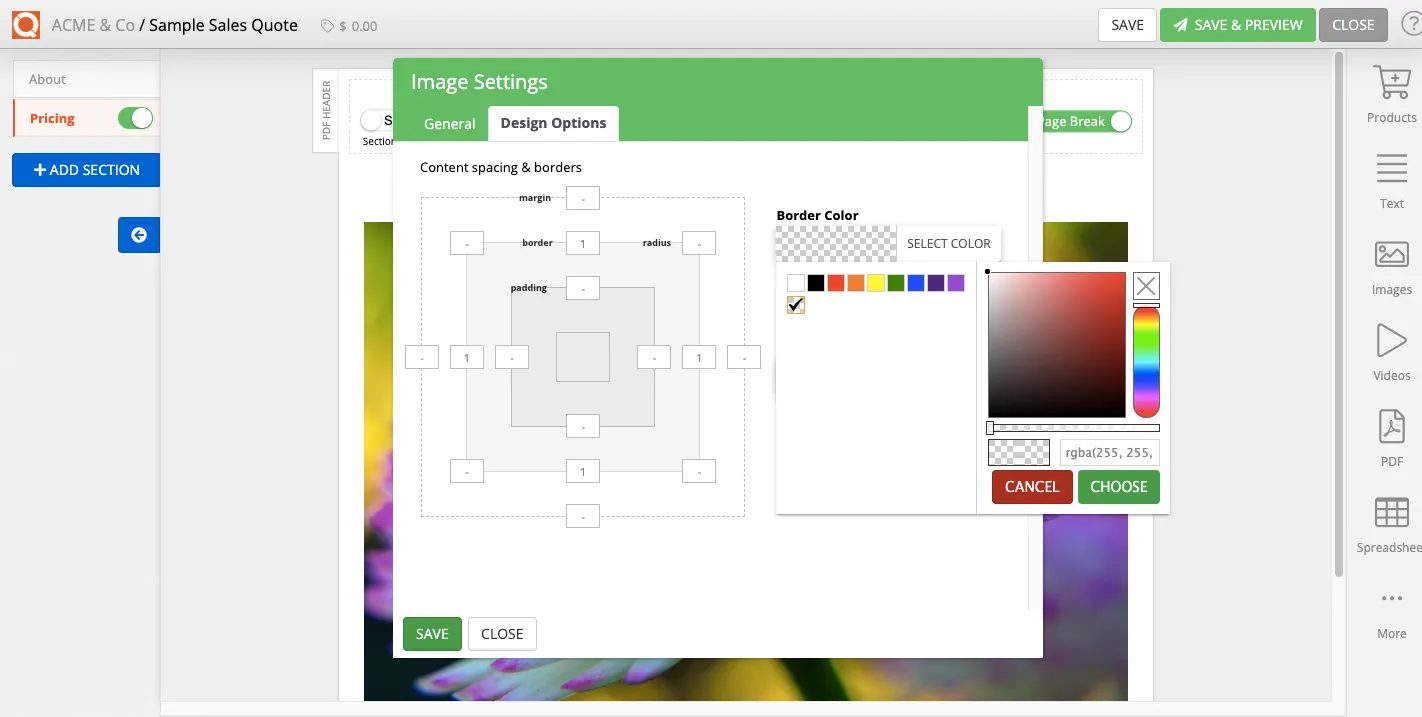
Next, set the colour of the border, click on the Border Colour selector.
![QuoteCloud - Sales Quote, Sales Proposal and Contracts Software - Margins, Padding and Borders for content blocks - illustration 9c383b82-56b4-4e8b-8dc8-b1de503d73d8](/_next/image?url=https%3A%2F%2Fs3.quote.cloud%2Fstores%2F_images%2Fhelp_center_July2020%2FSales-Quote-Editor-Borders-5.webp&w=3840&q=100)
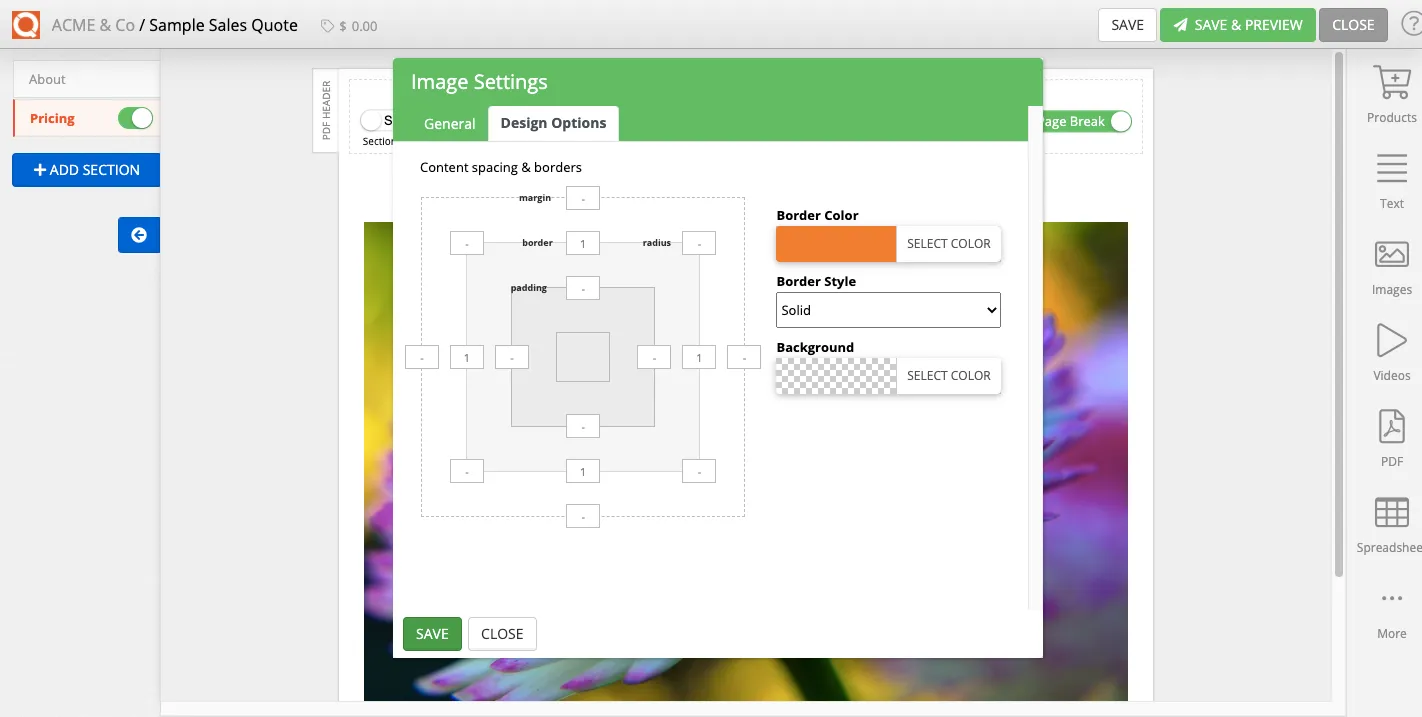
Finally, select the Border Style. Click on Save
![QuoteCloud - Sales Quote, Sales Proposal and Contracts Software - Margins, Padding and Borders for content blocks - illustration dfd131ed-6687-4bd0-a0eb-2a0d64fb5b4f](/_next/image?url=https%3A%2F%2Fs3.quote.cloud%2Fstores%2F_images%2Fhelp_center_July2020%2FSales-Quote-Editor-Borders-8.webp&w=3840&q=100)
Related User Guide Topics
![Margins, Padding and Borders for content blocks](/_next/image?url=https%3A%2F%2Fs3.quote.cloud%2Fstores%2F_images%2Fhelp_192x192.webp&w=3840&q=75)
![Styling The Price Table Layout And Colours](/_next/image?url=https%3A%2F%2Fs3.quote.cloud%2Fstores%2F_images%2Fhelp_192x192.webp&w=3840&q=75)
![Changing the Tab Style in Sales Quotes](/_next/image?url=https%3A%2F%2Fs3.quote.cloud%2Fstores%2F_images%2Fhelp_192x192.webp&w=3840&q=75)
![Adding Images from the Stock Image Library](/_next/image?url=https%3A%2F%2Fs3.quote.cloud%2Fstores%2F_images%2Fhelp_192x192.webp&w=3840&q=75)